Brussel sprouts are a cool-season vegetable crop and a close relative of kale, cauliflower, and broccoli. If you’re interested in growing them in your garden, then you should learn about the five brussel sprouts growing stages.
Here’s a short guide to the growing stages of brussel sprouts and how to care for the vegetable plant until harvest.
Brussel Sprout Growing Stages
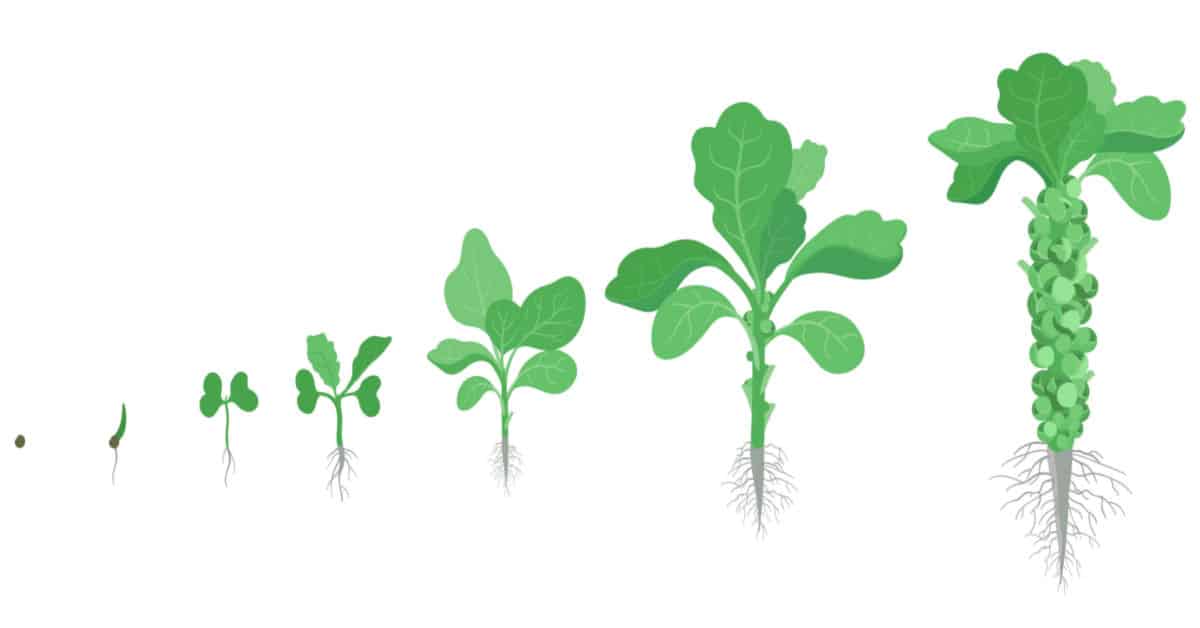
Stage One – Starting the Seeds
Brussel sprout seeds can be sown directly to the ground or in starter trays and germinate in 5-8 days. The ideal temperature for brussel sprouts is anywhere between 60 to 75 degrees F. Also, observe a space of 3-4 inches and a depth of a half-inch to allow the seedlings room to grow. Thin out the seedlings to 14-24 inches apart once they are about 4 to 6 inches tall.
The best medium for brussel sprout seedlings is a rich soil that has plenty of organic matter such as aged compost and peat moss. This gives them a boost of nutrients they can use to reach the next stage of development. It is worth noting that you should start giving the plants light exposure once you see the first set of true leaves starting to form.
Stage Two – Planting the Seedlings
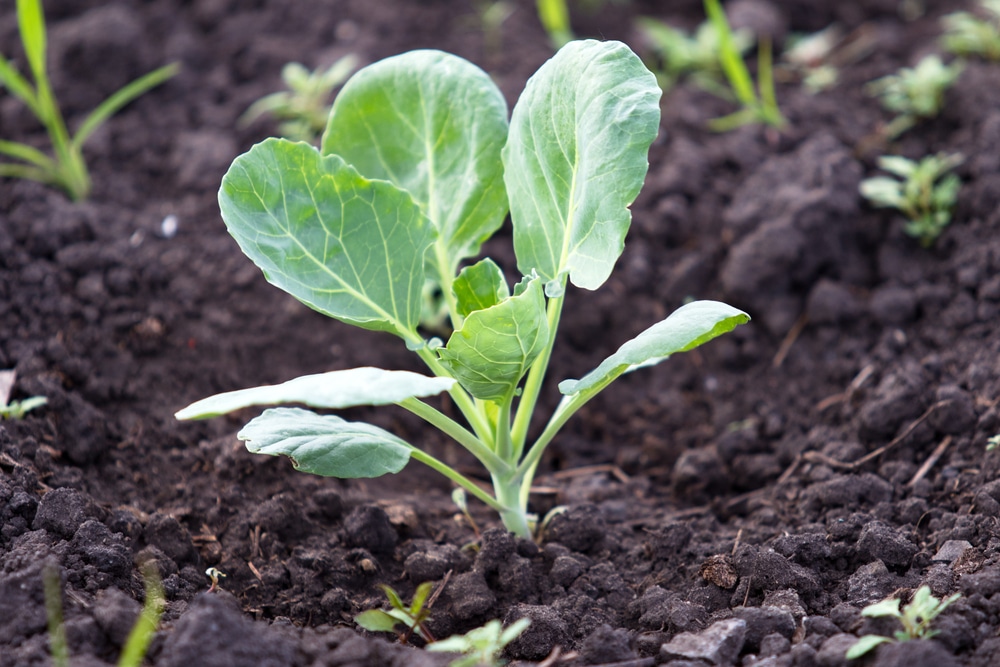
Although brussel sprout plants prefer cool weather, they still need full sun to reach their full potential. Choose the area where you will be growing these vegetables wisely. Brussel sprouts will need anywhere between 4-6 hours of direct sunlight each day to produce healthy leaves. However, the site should have a form of protection from the afternoon sun to prevent bolting and scorched leaves.
You can also grow brussels sprouts in containers that are at least 12 inches wide and deep. The soil should be well-drained, and the container must have drainage holes at the bottom. From there, you can place the vegetables in an ideal location and provide regular watering to keep the soil moist.
The seedlings should progress to sprouting small leaves that look like cabbages in the right environment. In several weeks the plants should grow anywhere between four to six inches tall- if you haven’t thinned them out yet, then now is the best time to do so. Remember to observe proper spacing of 14 to 24 inches between the stems. In containers, it is best to have only one strong specimen per 12-inch bucket or pot.
Stage Three – Growing the Brussel Sprouts
Your brussel sprouts should thrive and show signs of growth several weeks after the seedlings are established. As long as your plants are getting enough sunlight and water, they should grow taller and produce more cabbage-like leaves.
At this stage, you can apply a two or three-inch layer of mulch to stop weeds from invading and allow more moisture around the plants. Remember that brussel sprouts grow slowly and take their time to fully mature, so it’s best to be patient while keeping a mindful eye on your crops.
When your brussels sprouts are around 10-12 inches tall, you can begin feeding with a balanced formula of 10-10-10 in the NPK ratio, or one that is rich in nitrogen. Alternatively, you can opt for organic options such as aged compost or fertilizer such as fish emulsion to support its growth.
Other than that, there’s no other special requirement for growing brussel sprouts. Keep the temperature within the ideal range (60 to 70 degrees F), give it plenty of sun, and irrigate regularly. You will soon see sprouts forming on the stems.
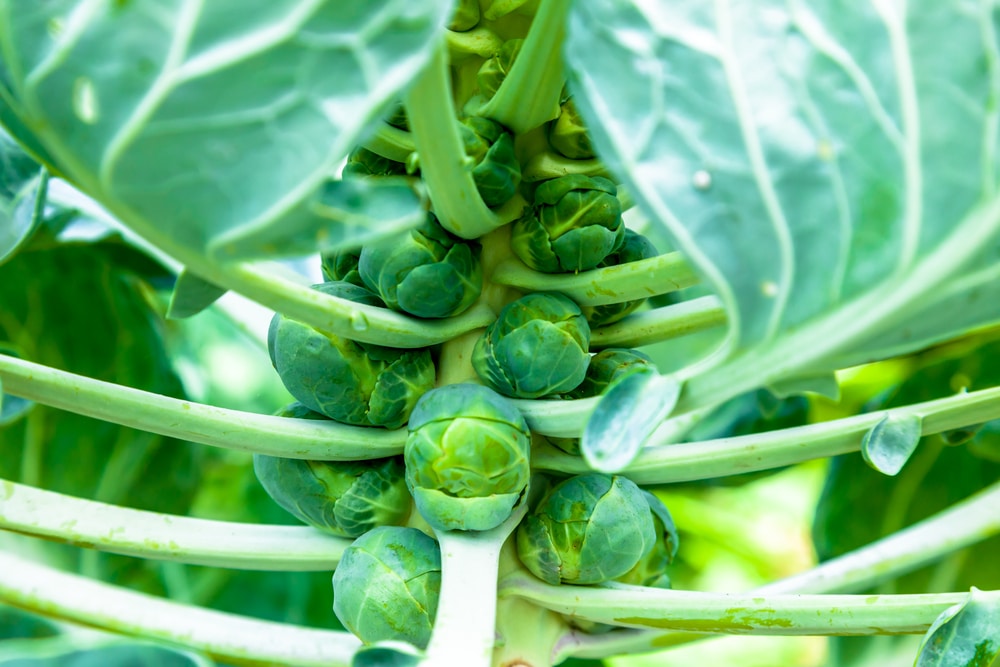
Stage Four – Maintaining the Sprout Formation
Your vegetable crop will begin production of sprouts around 50 to 55 days after you plant them. Miniature cabbages will begin appearing on the axil, or the area where the stem and leaves meet.
At this stage, you can start pruning your brussel sprouts to get a greater harvest. Once the plant reaches around 16 to 20 inches you can pinch the top to encourage side shoots and bushier growth. You can also remove the lower leaves on the stalks as the cabbage-like sprouts develop and turn into full-fledged vegetables.
Caring for brussel sprouts includes removing weeds by hand as they appear, and creating a stake or similar support structure in windy conditions. Pests such as aphids, cabbage worms, and loopers might appear, as well as cutworms. You can purchase cutworm collars and attach them early on, or spray them with BT (bacillus thuringiensis) as a form of insecticide.
Check your brussels sprouts regularly and once the cabbage-like sprouts start to appear. Have a bucket of soapy water on hand so you can hand-pick and put the worms and pests in it to destroy them. As a side note, you should keep your garden free of debris to reduce fungal diseases. Dispose of diseased plants as soon as you can to keep the blight from spreading.
Stage Five – Harvesting the Brussel Sprouts
Generally speaking, you can start harvesting brussel sprouts after 85 to 95 days. The exact days will depend on the variety of brussel sprouts you’ve planted and the climate in your area.
Take a close look at the sprouts and pick the vegetables as they start to turn yellow. The right size will be an inch or two, and when the buds are firm to the touch. Harvest from the bottom and work your way up.
It’s recommended that you remove the yellow leaves on top of developing buds to give them room to grow. Use a sharp knife that’s been sterilized to remove the sprouts from their stems. Do this carefully so you won’t damage the surrounding stem or foliage.
Brussels sprouts taste better after the plant experiences a light frost. Remember, they are cool-season vegetables and prefer lower temperatures, but brussel sprout plants will not survive a hard frost. You can continue harvesting the sprouts as it grows upwards until the cold season comes.
Remove the yellow or discolored outer leaves before you store the sprouts, and do not wash until you are ready to use them. Sprouts can be kept fresh for about a month as long as they’re kept in a cool and dry place.