Kale is a powerhouse of nutrients, offering an excellent source of vitamin A, calcium, copper, and manganese, among many others. So, whether you planted kale for its health benefits or because you need it for your favorite recipe, first-time kale growers are often unsure when and how to harvest it.
The good news is that it’s easy to know when to harvest kale, and the process only takes a couple of minutes. Read on to become a kale harvesting expert.
When To Harvest Kale

The timing for harvesting kale depends on whether you want small or large kale leaves. The good news is that it’s easy to determine when your kale is ready for picking based on the time amount of time that’s passed since you planted the seeds.
The breakdown is as follows:
- Baby kale: 25 to 30 days after planting
- Large kale: 60 days after planting
Keep in mind that if you pick large kale, you’ll still encounter small leaves. That’s because kale plants have as many as ten leaves per stalk, and the leaves closest to the stalk’s center are always smaller than the outer leaves.
Harvesting Seasons
Kale is a bountiful leafy green that often offers two primary harvesting seasons:
- Late spring or early summer
- Fall
So, after you complete the first harvest, don’t uproot this plant. Instead, wait until the leaves grow back and harvest them again.
It’s hard to go wrong with harvesting kale. The size of the leaves is up to personal preference; they won’t harm you no matter their size when you eat them.
Nevertheless, waiting too long to harvest the large kale leaves can lead to them turning yellow and falling off the plant. For this reason, many people like to harvest their kale every one to two weeks after the initial picking. Doing so will spark lots of small leaf growth for your salad.
How To Harvest Kale
Once your kale is ready for harvesting, follow the steps below to pick it.
Step 1: Choose the Leaves
It’s important to harvest only the outermost kale leaves so that the plant has enough leafy greens to continue photosynthesis. If you pick all the leaves on the plant, you’ll kill it. Therefore, we recommend leaving at least five leaves on your kale plant at all times.
Step 2: Snap the Stems for Large Kale
If you waited 60 days for your kale leaves to grow large, you don’t need any equipment to cut them. Instead, hold a single leaf at its base and gently pull the leaf away from the plant. Then, using a quick motion, snap off the leaf, allowing an inch or two of the stem to remain on the plant’s base.
Should the soil around your kale be soft from heavy rain, we recommend using scissors or a knife to remove the leaves. That way, you don’t have to worry about uprooting your plant.
Step 3: Pinch or Cut the Stems for Baby Kale
If you’re harvesting baby kale leaves, you have two options—pinching or cutting them. Pinching is an ideal method if you have fingernails and will be gathering a small amount of kale. As with large kale leaves, you’ll want to remove the baby leaves at the base of the plant, one or two inches from the ground.
Alternatively, you can use a knife or scissors to do the same. These are excellent methods if you have a lot of baby kale to harvest. It’ll also save you time from scrubbing beneath your fingernails afterward.
Tips for Harvesting Kale
Below are some guidelines to help you prepare to harvest your kale.
- Don’t harvest more than one-third of the plant at a time.
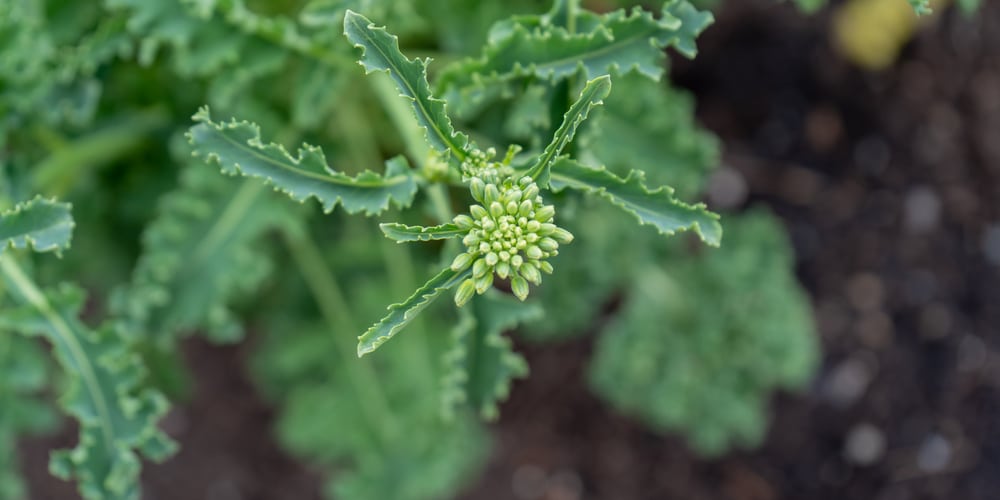
- Don’t pick the terminal bud at the plant’s center.
- Never cut the plant’s root.
Remember, you should always work your way harvesting from the outside of a kale plant to the inside.
Many gardeners also like using the size of their hands as a gauge for when their kale is ready for harvesting. Once the leaves are about the size of their palm, they often like to harvest them.
Identifying Bad Kale
No matter how careful you are with taking care of your kale, the inevitable moment will come when some of the leaves are unsuitable for eating.
Some of the many pests and diseases that can impact kale include:
- Alternaria leaf spot
- Downy mildew
- Cabbage aphid
- Cabbage looper
- Black rot
In some cases, such as with the cabbage looper, which is a caterpillar, you can eat around the holes these insects “leave” in the leaves.
But many fungal and bacterial diseases listed above make kale look unappetizing. In those cases, it’s best to remove the affected leaves. You should also visit your local garden store so that they can help identify the problem and offer you solutions for fixing it.
If kale isn’t grown in the right conditions it can also bolt and produce flowers.
The Bottom Line
Harvesting kale is rewarding. It’s a plant that keeps giving, seeing that it grows back more than once during a season.
Most kale plants are annuals, meaning you’ll need to plant new seeds every year. But depending on the species and climate where you live, you might be able to grow them as perennials.