Isn’t it wonderful to look out over the lush, green grass you’ve taken care of? A thriving lawn demands a lot of maintenance over time. Watering, mowing, and fertilizing are some maintenance practices everyone uses. Let’s look at how to aerate lawn by hand.
How To Aerate Lawn by Hand

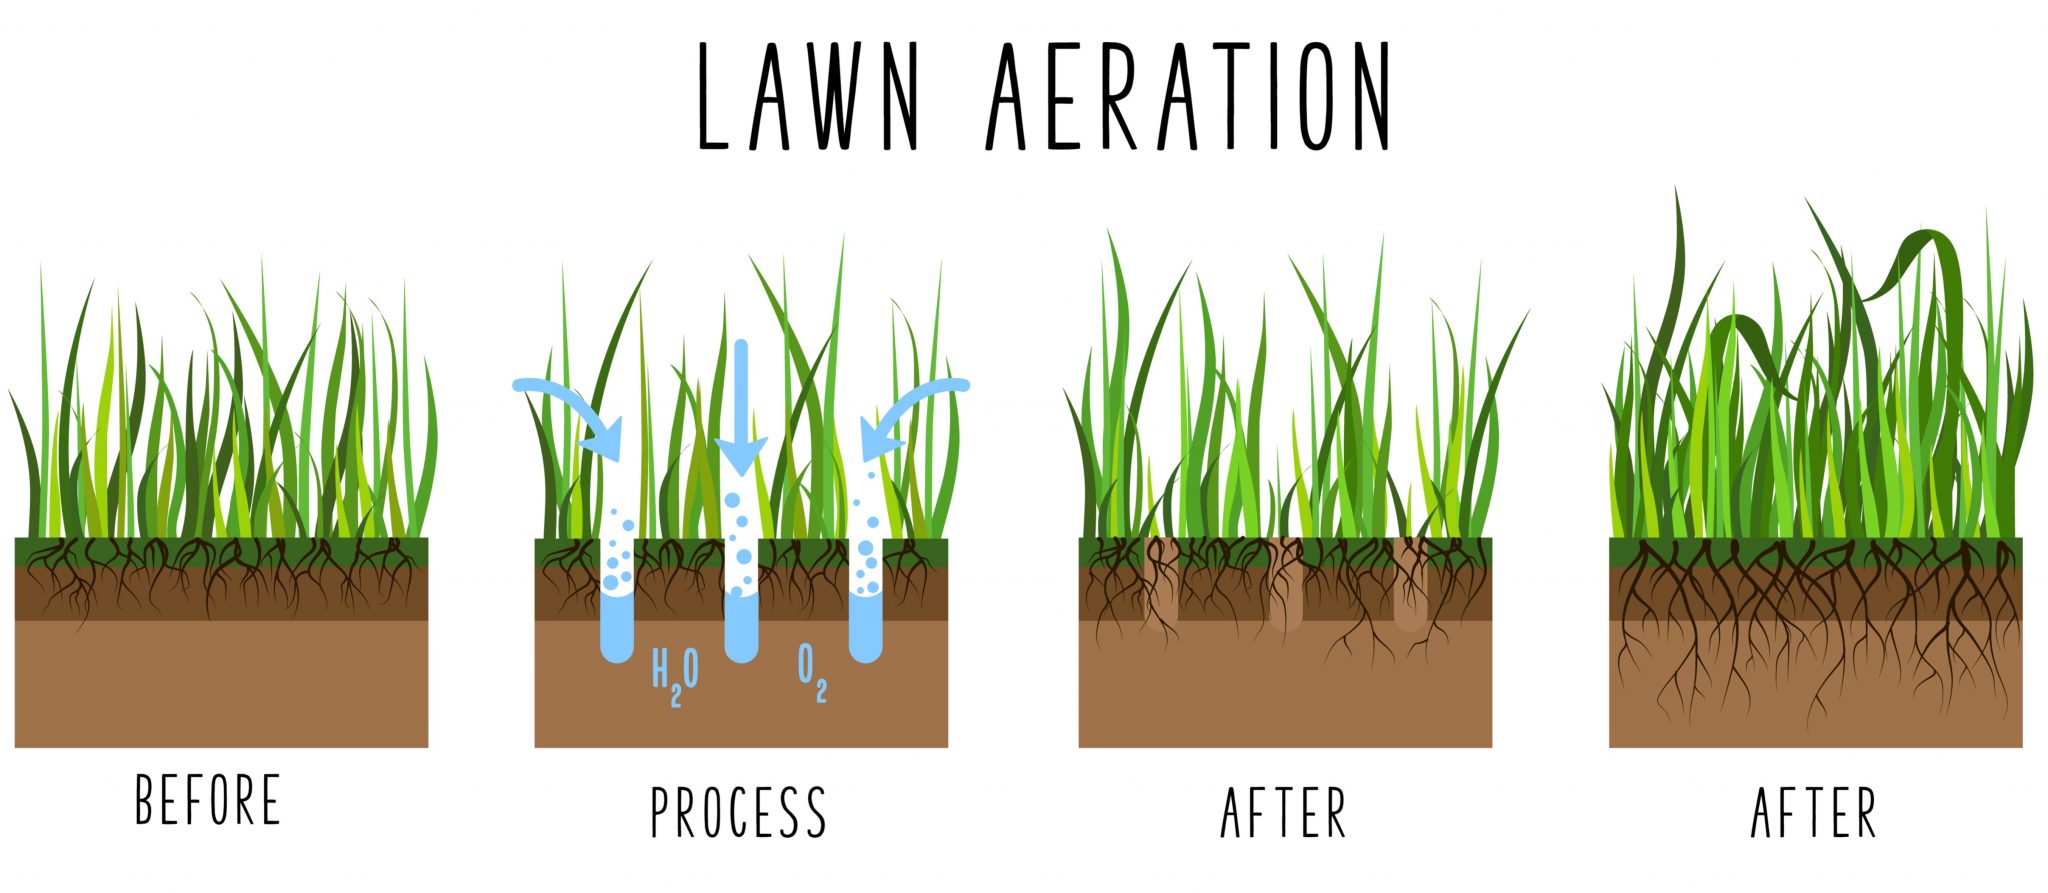
If you want a lawn that is incredibly attractive and vibrant, you’ll need to do more than just fertilizing and watering, and that’s aeration. Aeration entails breaking microscopic holes in dense soil to increase the amount of oxygen, water, and nutrients that can permeate through.
Step 1: Determine When It’s Right
Aerating cool-season grasses such as Kentucky bluegrass, for instance, will yield positive results if you do it in the fall. On the other hand, aerating warm-season grasses such as Bermuda will be perfect when you do it in the late spring or early summer.
During this time of the year, your grass is in its active growing phase and will respond fast by better using the additional nutrients, water, and oxygen. Moreover, the grass will thrive if you aerate it immediately before its active growth period starts. It’s not a good idea to do it when your grass is dormant.
Step 2: Establish the Type of Soil
The frequency you should aerate a lawn depends on the soil type. Lawn aeration will be most effective when you do it on moist but not dry soil. When working in wet soil, the aerator’s spikes can penetrate the surface quickly. Overly damp soils get muddy, making it challenging to work on them, and they might destroy the lawn.
Since dry soil makes it more difficult for spikes to penetrate the ground, loosening the soil will not be as beneficial as it ought to be. Aerating a frozen lawn might create issues associated with damp soil, so it’s best to wait until the ground snow melts.
Push a screwdriver at least 6 inches long into the soil to see if it is moist or dry. If you can push the screw into the ground with less effort and it comes out with soil adhering to its side, the soil is damp enough. In that situation, you shouldn’t water the lawn.
However, the soil is overly wet if the driver is particularly muddy. The lawn doesn’t need any watering. Wait about 2 to 3 days to recheck the moisture before you can aerate.
Step 3: Understand Your Lawn Behaviors
Each homeowner distinctly uses their lawn. To prevent soil compaction, it’s essential to adopt annual aeration for lawns that are driven on regularly or accommodate children throughout the year.
There’s also no reason to hurry into aerating if your lawn is still immature. It takes about a year for the seeds to sprout and grow healthy root systems, so be patient. It’s also a good idea to inspect the grass’s roots to see how deep they go.
You should proceed to aerate your lawn if the root’s depth is less than two inches. You may determine your lawn’s roots’ depth by inserting a little shovel or screwdriver into the ground.
Step 4: Ready Your Lawn
Aerating your lawn will be a breeze if you take the time to prepare it beforehand. You can use a rake to remove your lawn’s dead leaves, branches, and other trash. To prevent accidental damages, label all:
- Sprinkler heads
- Cables
- Other lawn’s stationary items
Mow the grass to make it easier for the hand tool to penetrate the ground. Check to see how moist the lawn is. Leave the sprinkler on all night to make the soil more permeable and more straightforward to work with. The hand tool will have trouble penetrating the soil if excessively dry, but you can aerate in light rain.
Step 5: Aerating Your Lawn
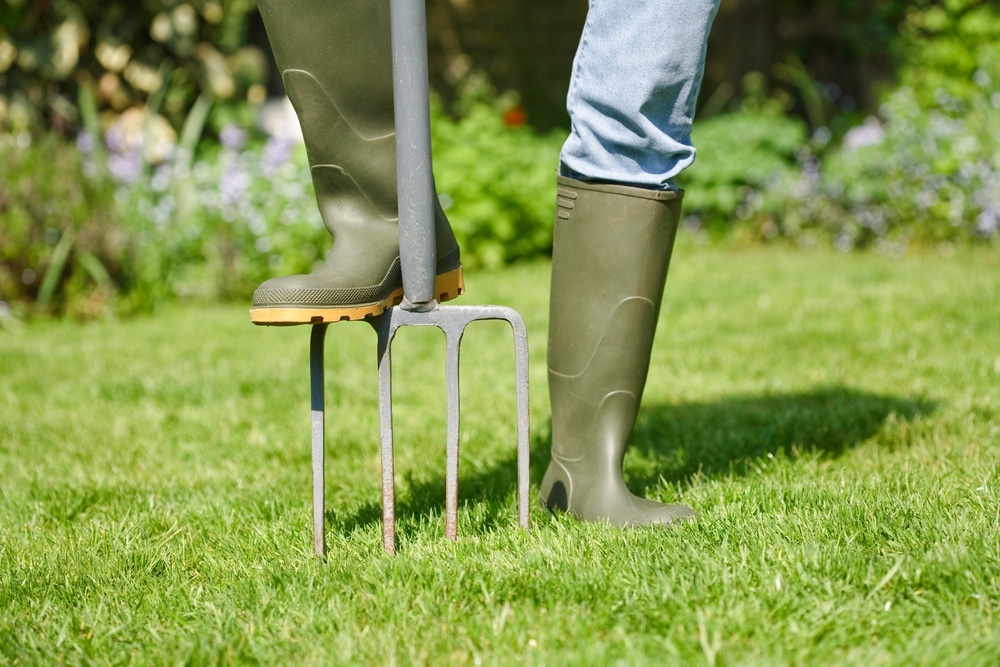
A garden fork, hand spike aerator, or hand-core aerator would all come in handy for this task. Choose a corner in your yard and work your way across it in straight lines. While holding the core aerator firmly in both hands, make a strong forward thrust into the ground. You must pull the core aerator out to remove the soil plugs.
It is best to make a 4 to 6 inches skip when removing soil plugs. Ensure to push it in again to within 4 inches, then pull. Do that until you’ve aerated the whole yard. If the soil is dense or there is a lot of foot activity, you may need to make a second perpendicular move.
Although the soil plugs could make the yard look unattractive, you should leave them there. The soil plugs’ bacteria will decompose the organic matter allowing for a greater release of nutrients into the soil. You can rake them up and leave them on the lawn, making them less noticeable and speeding up the decomposition process.
Using a garden fork or a spike aerator, you should move straight across the yard as you push the tool into the ground. It can pierce the ground without removing any soil.
Don’t stress if you can’t finish the work in a single day. You are free to proceed the following day.
Step 6: Irrigate the Lawn
You should irrigate the grass with around 1 inch of water, so turn on your sprinklers. Water after two to three days to speed up the recovery process. It’s the ideal time to add seeds and fertilizer to the lawn if you plan to overseed it when aerating. To aid seed germination, keep irrigating consistently over the next few weeks.
Final Thoughts
The benefits of aerating a lawn are numerous. It’s ideal to ensure that oxygen, nutrients, and water reach the grass’s base. Furthermore, you can reduce the overflow of fertilizer and pesticides, which results in a waste reduction.
Whether you do it yourself or hire someone else, it’s a necessary step you need to take to maintain the lushness, green color, and thickness of your grass. And you do not need to depend on machines either. You can always aerate the lawn by hand.